
Step 1: Unbox the Essentials 📦
Take a moment to unbox your new Home Unity router. Inside, you'll find the essential components that you need – power adapter, a router, DSL filter and a grey RJ11 cable. You can keep the ethernet cable safe.
Step 2: Find your master telephone socket 🌐
Look and find your master telephone socket (see below), often found in hallways or near your entrance. The master socket will usually say BT or Openreach on it and there are 2 types of socket which have different ways of setting up (don't worry, we've got a section below for both types).
You may have more than one socket in your home, but only one should say Openreach or BT on it. This is the socket to connect to for the best experience (as you're connected directly to the internet line). Extension sockets may not work, could be faulty and may cause your speeds to be slower, so it's best to use the master socket.

Step 3: Connect the Dots 🔄
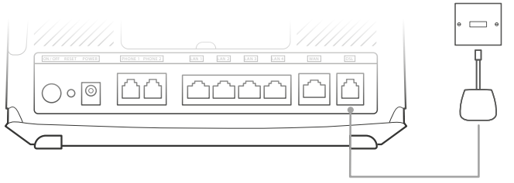
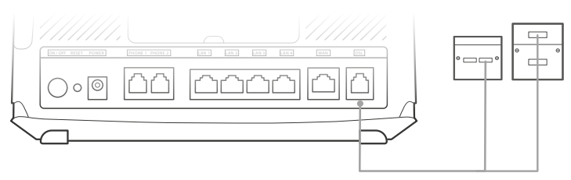
It's the digital handshake that establishes the connection – easy peasy.
Step 4: Power It Up! ⚡
Plug in the router to power it up. The lights will do their dance, signalling that your internet connection is in business. Within a few minutes, you should see the following lights on your router go green; the power light (the circle with the line through), the Wi-Fi light (a dot with curved lines getting bigger) and the internet light (the globe symbol).
If the power light doesn't go green, press the ON/OFF button on the back of the router and wait a minute, then the lights should go green.
Your internet light (the globe) will go red for a few minutes. This is completely normal and after around 5 minutes you should see it go green, then you're good to go! Please don't restart your router whilst it's working its setup magic.
Step 5: Link Up Your Devices to Wi-Fi📱
Locate the network name (Wireless SSID) and password (Wireless Password) found on the back of your router. Use these details to connect your devices to the Wi-Fi. Soon, all your gadgets will be happily online.
If you can't see the Home Unity network name on your device's Wi-Fi, check the 2.4G and 5G lights are green on the router. If they're not, press the WIFI button on the back of your router.
Step 6: Link Up your Devices to Ethernet 💻
If you prefer connecting your devices using a wired cable, simply connect one end of the yellow ethernet cable to any of the 4 LAN ports (the yellow ones) on the back of your router, then connect the other end to your device and away you go!
Step 7: Test Your Connection 🌐
Time for a quick check! Test your connection speed to make sure everything is running smoothly (you can find a useful how-to blog here). If you encounter any hiccups, don't hesitate to reach out for assistance through our Contact Us page.
There you have it – a hassle-free guide to setting up your router. Enjoy your internet experience without the tech headache. Happy browsing! 🚀🌐